February 2013

Sometimes you just want a huge pile of carbs and delicious meat. Sometimes you don’t want to eat salads and steamed vegetables. Sometimes being bad (on your diet) is good. Sandwiches are one of my biggest vices. Carbs and meat together make a magical couple. I love tacos and burritos, but sometimes I want to sink my teeth into a fluffy cloud of bread instead of a tortilla. That is why I love tortas. If you guys are looking for a serious sandwich, I can say that this should be considered.
♥ Teri

Carne Asada Torta
Makes 2

marinade:
2 teaspoons garlic powder
2 teaspoons onion powder
2 teaspoons smoked paprika
1 1/2 teaspoons cumin
1 teaspoon chile powder
1 teaspoon cayenne pepper
1 teaspoon salt
1/2 teaspoon black pepper
1/2 teaspoon ground ginger
2 garlic cloves, minced
1 lime, juiced
3 tablespoons extra virgin olive oil

1 lb. flap steak or skirt steak
sandwich assembly:
2 telera rolls
shredded iceberg
avocado spread
sliced tomatoes
thinly sliced red onions
crumbled cotija
pickled jalapenos
hot sauce

1. Place marinade ingredients into a small bowl and whisk together. Place meat into a re-sealable plastic bag and pour marinade mixture/paste over meat.Close bag and shake until marinade has been evenly distributed over the meat. Allow meat to marinate for at least 2 hours and up to 12 hours.
2. Heat a grill or grill pan to high heat. Spray surface with cooking spray and grill meat for about 4 minutes on each side, lightly seasoning with salt and pepper. Transfer meat onto a cutting board and allow to rest, 5 to 7 minutes. Cut into two portions.
3. To assemble: Schmear avocado spread across the tops and bottoms of the telera rolls. Top bottom buns with meat followed by tomatoes, red onions, iceberg, cotija, pickled jalapenos, and hot sauce. Gently press the top buns over the sandwich. Serve.

Carne Asada Torta

February 27, 2013 · Everyday Recipes · 17 comments · PRINT

stumble
Share

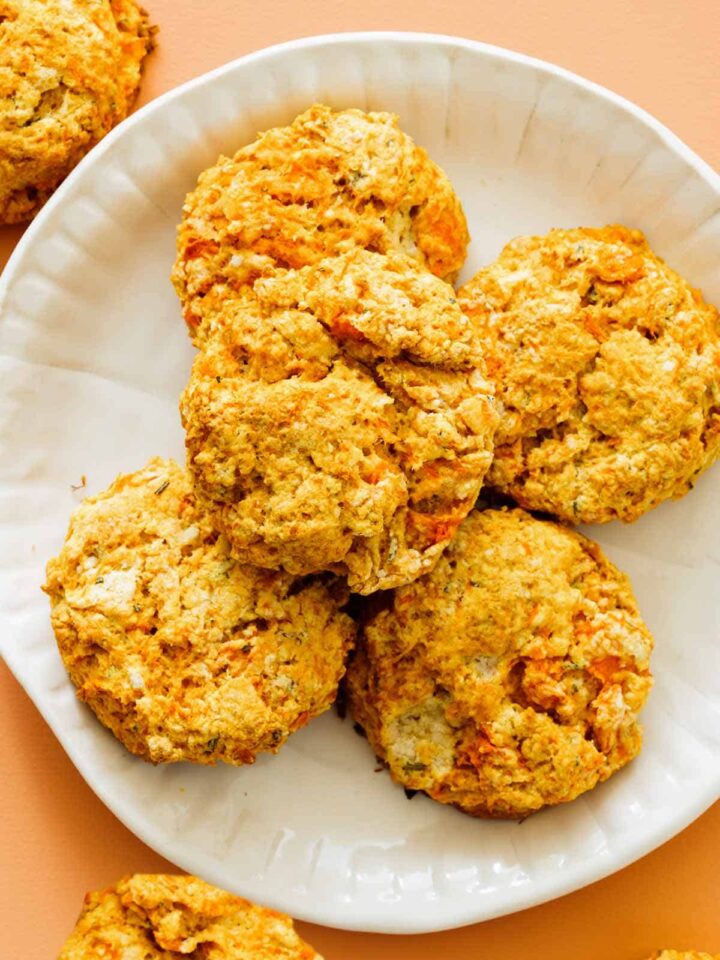
Hi Guys! We have more biscuits for you today because it’s Monday and I need something really awesome to keep me going this week. I love sweet potatoes….everything about them. I love their creamy texture, with the hints of natural sweetness they carry…so good. I love cooking with them, but more so I love love love baking with them. When you bake with potatoes it’s like adding instant moisture to whatever it is you’re making. We made these guys a little while back and they’re one of my favorite kinds of doughnuts….with the cutest name, Spudnut! Super cute, right? Not only does baking with sweet potato add a smooth texture and tons of moisture, but they also add a gorgeous orange tinge to whatever it is you’re making as well.

Anyways, back to these biscuits. I love them. Really. They don’t rise quite like regular biscuits because I’ve added so much potato to this (for fluffier biscuits scale back on the sweet potato and add more flour), but they taste amazing! The rosemary is just an added bonus that go really well with the sweet potato. These are best eaten plain, with a schmear of butter or dipped in a nice, thick soup or chowder, like this one! Enjoy! xx, Jenny
Sweet Potato and Rosemary Biscuits
Makes 12

Ingredients:
1 1/4 cup all purpose flour
1 tablespoon granulated sugar
2 teaspoons baking powder
1 1/2 teaspoons salt
1/2 teaspoon ground cinnamon
1/2 teaspoon black pepper
1 stick (1/2cup) unsalted butter
1 small sweet potato, peeled, boiled and mashed (about 3/4 to 1 cup)
1 1/2 tablespoons fresh rosemary, minced
2 to 3 tablespoons buttermilk

1. Preheat oven to 400°F.
2. Place flour, sugar, baking powder, salt, cinnamon, and pepper into a bowl and whisk together.
3. Cut in butter with a pastry knife or using your fingers until a fine grainy texture forms.
4. Fold in rosemary, sweet potato and buttermilk and stir until dough just comes together.
5. Turn dough onto a clean surface and cut out 3 inch rounds using a circle cutter. Place biscuits onto a baking sheet lined with parchment, about 1 inch apart, and bake for 15 to 20 minutes or until the tops are golden brown and the biscuits have baked through. Serve warm.
6. To store: Place biscuits in an airtight container and place in the refrigerator for up to 3 days. Warm before serving.

Sweet Potato & Rosemary Biscuits

February 25, 2013 · Everyday Recipes · 21 comments · PRINT

stumble
Share

Happy Friday! I’m really excited for the weekend. Why? Because I am babysitting a cute little puppy some of you may know. I cannot wait to go to the dog park for little dogs, and touch her big ears, and make fun of her cankles. FUN. Weekends are made for this stuff. Weekends are also made for delicious breakfast situations like the one we have to today. I am really excited about it because there are a couple of things that make these pancakes awesome. The first is that we folded in egg whites to make these cakes light and fluffy. They are not rubbery or chewy, but delicate and melt in your mouth-is. We have also added some orange zest. Other than the bacon, this is my favorite part. It is not overwhelming at all, and it does a super nice job of balancing the salty bacon with the sweet chocolate. YUM. What are you guys doing this weekend?
♥ Teri

Chocolate Chip, Bacon and Orange Kissed Pancakes
Makes about 10

Ingredients:
1 cup all purpose flour
1 1/2 tablespoons light brown sugar
2 teaspoons baking powder
1 teaspoon salt
1/2 teaspoon baking soda
1/4 cup butter, melted and cooled
3 to 5 tablespoons buttermilk
1 egg
2 egg whites, optional
2 tablespoons superfine sugar (granulated is fine), optional
6 to 8 rashers bacon, cooked and crumbled
2/3 cup milk chocolate chips
1 large orange, zested
softened butter, for serving
maple syrup, for serving

1. Preheat a griddle over medium to medium-high heat.
2. In a large mixing bowl, combine flour, brown sugar, baking powder, salt, and baking soda. Whisk together and set aside.
3. In a small mixing bowl combine butter, buttermilk and egg, whisk together and set aside.
4. Optional Step: Place egg whites in a mixing bowl and using a hand mixer, beat egg whites until frothy. With mixer still running, add sugar and continue to beat until medium peaks form. Set aside.
5. Stir the flour mixture with the butter mixture until mixed together (don’t overmix). Fold in the bacon, chocolate chips and orange zest. Fold in the whipped egg whites (if using), until just combined.
6. Grease the griddle with butter or vegetable oil and drop 1/3 cup scoops onto the hot surface. Cook until large bubbles form on the surface of the pancake, 3 to 4 minutes. Flip pancakes and continue to cook for 2 to 3 minutes. Place onto a baking sheet and store in a warm oven while cooking remaining pancakes.
7. Serve hot with butter and maple syrup.

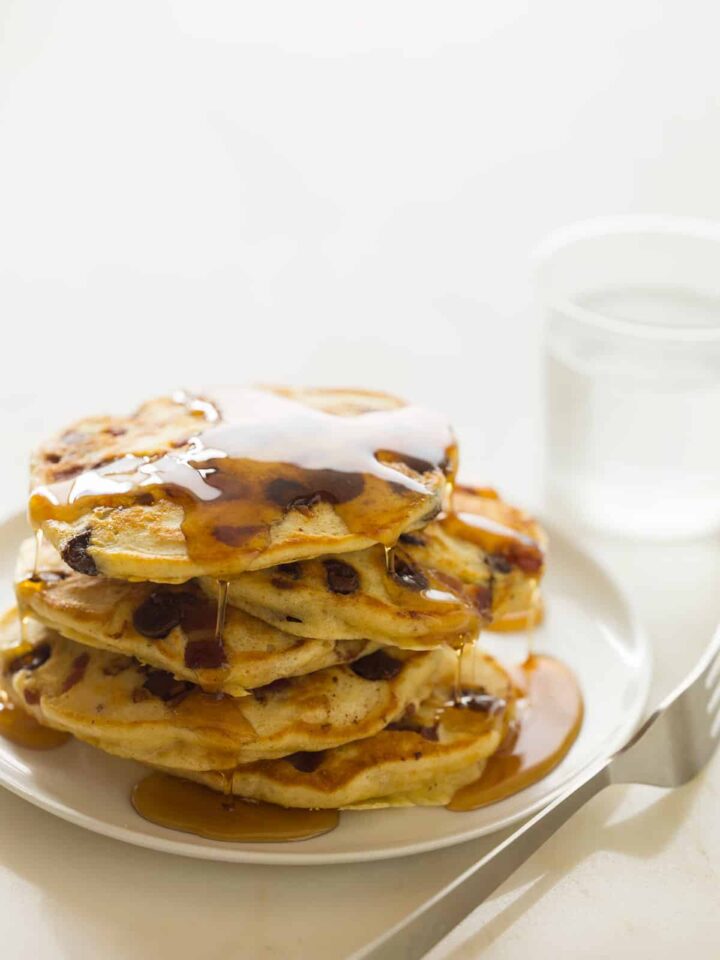
Chocolate Chip Bacon & Orange Kissed Pancakes

February 22, 2013 · Everyday Recipes · 20 comments · PRINT

stumble
Share

Hey guys! Lets get straight to food today. We have one of my new favorite salads….one with roasted dates! I love dates, their natural sweetness and how they lends themselves so well to baked goods, their ability to turn almond milk into a delicious milkshake like beverage and just being able to wrap some bacon around them and call it a day. Dates are awesome. Today we’ve roasted them and tossed them into a salad. If you’ve never roasted dates…PLEASE.GO.DO.IT. They become these delicious candy-like things with a crisp exterior and wonderfully chewy interior (I’m a major texture person, you all know this)….that combined with the thin, crispy prosciutto, pungent bleu cheese and crunchy almonds…whoa, so good!

I used California dates in this salad over of the much prized Medjool dates because they are slightly less sweet and don’t caramelize are quickly as Medjools would in the oven. They also have a firmer texture which aids them in the roasting process. You do need to be careful though and make sure to keep an eye on these things in the oven. Thy can burn fairly easily and even if they don’t burn, if you pull them out a little “late” then you’ll end up with rock hard dates instead of delicious crisp and chewy bites! If you want a heartier salad, feel free to use kale…just as delicious! You can also swap the prosciutto out for crispy pancetta or bacon (although I would recommend speck, if anything), but I sort of like the oober, thin and crispy bit of prosciutto throughout the salad, which really helps to highlight the rest of the ingredients, rather than overwhelm them. You can also swap the bleu cheese out for goat cheese or a nice and salty ricotta salata as well as the toasted almonds for Marcona almonds (my favorite). This is a great salad to make for yourself or guests if you’re craving something slightly different and slightly decadent. Enjoy!
xx, Jenny

Roasted Date Salad
Serves 3 to 4

Ingredients:
1 recipe balsamic-vinaigrette
8 California dates, pitted and cut in half lengthwise
2 tablespoons balsamic vinegar
2 teaspoons extra virgin olive oil, divided
3.5 ounces prosciutto
6 cups mixed greens
2 ounces bleu cheese, crumbled
1/4 cup chopped, toasted almonds (or Marcona almonds)
salt and pepper to taste

1. Preheat oven to 375°F.
2. For the dates: Place dates, balsamic vinegar and 1 teaspoon oil into a mixing bowl and toss together until the dates are well coated. Spread in a single layer onto a baking sheet lined with parchment and roast for 10 to 15 minutes. Set aside and allow dates to cool.
3. Place a nonstick pan over medium-high heat and add remaining oil. Swirl around pan and add pieces of prosciutto. Sear on each side until crisp and set onto paper towels until ready to use.
4. To assemble: Place mixed greens into a large mixing bowl with half the dates, prosciutto (slightly crumbling), bleu cheese, and almonds. Add the vinaigrette and toss together. Top with remaining ingredients, lightly season with salt and pepper and serve.

Roasted Date Salad

February 18, 2013 · Everyday Recipes · 28 comments · PRINT

stumble
Share

There is nothing better than taking that first bite of a warm fluffy biscuit after depriving yourself of carbs because your thighs are huge. God I love bread, and chips, and everything carb, and biscuits. We have this wonderful easy biscuit recipe today. So easy to make, and a little bit sturdier than a flaky biscuit which is kind of nice because then you can totally build delicious breakfast sandwiches with them, or eat them on the couch and watch Girls and not get any huge crumbs down your shirt. I love them. I hope you do too.
♥ Teri

Sour Cream and Chive Drop Biscuits
Makes 9 to 12

Ingredients:
2 cups all purpose flour
1 tablespoon superfine sugar
2 teaspoons baking powder
1 1/4 teaspoons salt
1/2 teaspoon baking soda
1/4 teaspoon black pepper
3 tablespoons thinly sliced chives
2/3cup sour cream, chilled
1/2 cup plus 2 tablespoons milk, chilled
1/4 cup (1/2 stick) unsalted butter, melted (for brushing atop the biscuits)

1. Preheat oven to 400°F.
2. In a medium mixing bowl, combine all the ingredients, except the sour cream, milk and melted butter. Whisk together until no lumps remain.
3. Stir in the sour cream until the mixture resembles a bowl of coarse grains.
4. Add the milk and mix just until sticky dough comes together.
5. Using two lightly greased spoons or a lightly greased ice cream scooper, drop 1/4 cup sized balls of batter/dough onto a baking sheet lined with parchment, about 1 inch apart.
6. Bake biscuits for about 15 minutes, then remove them from the oven and brush the tops with melted butter. Place biscuits back into the oven and continue baking for another 5 to 7 minutes or until golden brown.
7. Allow biscuits to slightly cool before serving.

Sour Cream & Chive Drop Biscuits

February 15, 2013 · Everyday Recipes · 23 comments · PRINT

stumble
Share

Happy Valentines!

February 14, 2013 · News · 7 comments · PRINT

stumble
Share

Hey guys! So I think I should clarify something….. I don’t hate Valentine’s Day. Really. After Monday’s post a friend of mine called me to ask if everything was okay with the boyfriend and I….when I told her “yes! “ and asked why, she said it’s because it seemed like I was hating on V-day in my last post. I chuckled. So here’s a little clarification. I don’t hate Valentine’s Day. I think it’s a cute, albeit fake, holiday! My issue isn’t about the day itself, celebrating love, etc.; my issue is all the pressure it seems to put on people/couples to go hard and celebrate in the biggest way possible. If that’s what you and your partner want to do…GREAT! I just don’t think it’s necessary, that’s all…just do what ya feel like doin’, that’s all. :)

Now to these little “Deviled Hearts”…no bake cheesecake stuffed strawberries are nothing new. Totally delicious, but nothing new. We’re adding our own twist to this yummy dessert, by splitting them down the middle, scooping out the centers and piping the filling straight into them….”Deviled Hearts”…get it?! Just like the panna cotta from Monday, this dessert is SUPER easy (seriously takes 15 minutes, tops) and REALLY addicting. I actually made a very similar recipe for a upcoming issue of a popular food magazine (more on that as the issue approaches!) and when testing these…lets just say the boyfriend (aka, the taste tester) down 16 of them in one sitting….16! I also made these for the super bowl, but as a dip sitch and as soon as I set the platter out, people were huddling around it until they were gone….so I think we have a winner here! I’ve made these “New York Style” by adding a good amount of sour cream and lemon zest (I just love the tang). Folding the whipped cream into the mixture is key as it’ll give you a light and fluffy filling! If you’re looking for a last minute V-Day dessert…I recommend these! They’re a cute V-day dessert, but you can really make them for any occasion! I hope everyone has a fun and safe Valentine’s Day, doing whatever the heck y’all want! ;) xx, Jenny

Deviled Hearts
Makes 32

Ingredients:
1 (8 ounce) package of cream cheese, softened
2/3 cup plus 2 tablespoons superfine sugar
1/3 cup sour cream
1 lemon, zested
1 1/2 tablespoons fresh lemon juice
1 teaspoons vanilla extract
1 ¼ cups heavy cream

16 large strawberries, tops cut and split in half lengthwise
1/2 cup graham cracker crumbs

1. Place cream cheese, sugar, sour cream, lemon juice, zest, and vanilla in a medium mixing bowl. Beat together with an electric mixer, until smooth.
2. Scrape down sides of the bowl and set aside.
3. In another mixing bowl with the electric mixer, beat the cream until stiff peaks form.
4. Fold the whipped cream into the cream cheese mixture until fully incorporated.
5. Slice the backs of each strawberry, every so slightly, so they sit up straight. Using a small measuring spoon or melon baller, carefully hollow the inner center of each strawberry.
6. Fill a piping bag (fitted with a star tip) with the cream cheese mixture and pipe into each cut strawberry.
7. Finish each with a sprinkle of graham cracker crumbs and serve.

Deviled Hearts

February 13, 2013 · Party Food · 16 comments · PRINT

stumble
Share

Happy Mardi Gras everyone! To celebrate we have teamed up again with MYHABIT to create a typical Cajun style comfort dish. We made a super easy and super filling one pot Shrimp and Andouille Sausage Jambalaya Head on over the MYHABITS food blog, The FIX for the full recipe!

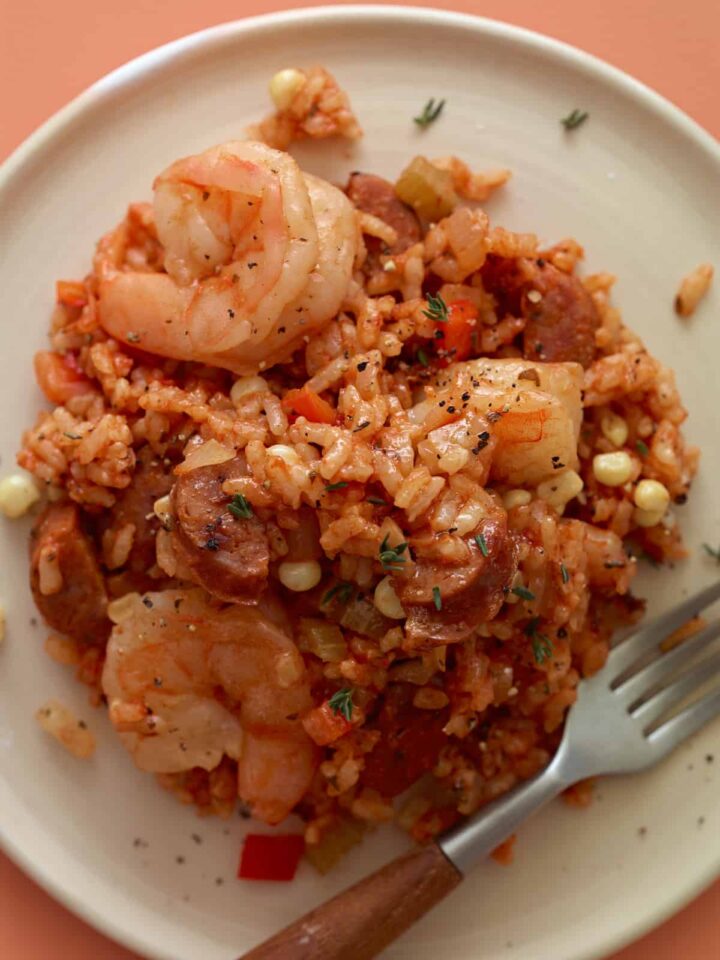
Shrimp & Andouille Jambalaya

February 12, 2013 · Party Food · 14 comments · PRINT

stumble
Share

Hey Guys! So, Valentine’s Day is this week and I’m already kind of over it. I mean enough already with the overtly sentimental jewelry commercials, the red and pink vomited aisles at drugstores and the rush to make dinner reservations at the most expensive and “romantic” restaurant you can think of….just stop it, please! Valentine’s Day isn’t supposed to be so complicated nor do I think it needs to be so….pink. It should be a time when couples take a little bit of time out of their busy schedules to tell each other, I like you and you make me happy…AND for singles to re-recognize the fabulousness that is he or she and be happy about it. I don’t think it needs to get any more complicated or cheesy. This year the boyfriend and I are going to cook a nice dinner together and watch movies….horror movies, that is…why? because that’s what we’re into and that’s what makes us happy! We’re also headed back up to Idyllwild (one of our favorite quick weekend getaway spots!) for the weekend with pooch in tow, for a few days of hiking and (hopefully) snow! We rented a cabin up there back in December and had the best time ever…plus, for a weekender the whole trip wasn’t expensive at all….hint, hint to anyone in So Cal in need of weekend plans. ;) So this year, maybe don’t stress yourselves out over buying expensive jewelry or going out to a place you can’t afford or don’t really want to go to; instead, just do something that you enjoy doing (whether you want to celebrate with a spouse or just some really great friends), that will make you smile and put you in a great mood….because why stress over a commercially manufactured holiday.

Today we have a dessert that I like to think of as one of the most low maintenance, tastiest desserts ever. Panna Cotta. Yum. Panna cotta is truly one of my all time favorite desserts (right up there next to doughnuts). Something about the oober soft and slightly sweetened cream, usually paired with a rich sauce/coulis, that I just can’t resist. Not only is this dessert extremely versatile and delectable, but also really hard to screw up! There are no eggs involved, no chemical leavening agents to worry about, just a little gelatin to deal with, and once you’ve bloomed the gelatin, the hard part (that’s really no so hard) is over. I’ve topped mine today with a mango-sage coulis because I wanted something reminiscent of warm weather (because it’s been freeeeezing out!) and because I still wanted something slightly earthy and lemony….enter sage. If this coulis doesn’t seem like the right one for you, you can also puree some raspberries with a little honey, sugar and lemon juice and you’ve got yourself a simple and tart raspberry topper. If you want a quick and easy topping that will also set nicely atop the panna cotta, then you can just get your favorite store-bought preserve, warm it ever so slightly, place some over your set panna cotta and continue to refrigerate for another couple of hours. If you’re looking for a super quick, low maintenance and delicious dessert to share with loved ones, I suggest you whip up a batch of this panna cotta…so easy, so good! Enjoy! xx, Jenny

Simple Panna Cotta with a Mango-Sage Coulis
Serves 8

Ingredients:
3 cups heavy cream
1 cup whole milk
1 1/2 vanilla beans, split with the caviar removed (or 2 1/2 teaspoons vanilla
extract)
2/3cup superfine sugar (granulated sugar is fine)
6 sheets gelatin (or 2 envelopes powdered gelatin [about 4 1/2 teaspoons])
mango-sage coulis:
1 1/4 cups frozen mangoes, thawed
2 tablespoons honey
2 tablespoons sage, roughly chopped
1/2 lime juiced and zested

1. Place sheet gelatin in an ice bath and allow to bloom. Set aside until ready to use. (If using powdered gelatin, sprinkle envelopes over 5 1/2 tablespoons cold water)
2. In a medium pot, stir together the cream, milk sugar and vanilla beans/caviar (or extract, if using).
3. Place mixture over medium heat and bring to a simmer, stirring occasionally to dissolve sugar.
4. Once sugar dissolves, 7 to 10 minutes, remove from heat and cover for 5 minutes. Remove vanilla bean pods and pour mixture into a large bowl.
5. Stir softened gelatin sheets into the hot mixture and allow to dissolve. (If using, powdered gelatin, pour and stir into mixture).
6. Once gelatin has completely dissolved, ladle mixture into small jars/cups/ ramekins (4 ounces each).
7. Place the desserts onto a baking sheet and chill in the refrigerator until they set, but are still very soft, 4 to 6 hours.
8. For the Coulis: Place all ingredients into a food processor or blender and blend until smooth.
9. To serve: Once panna cottas have set, spoon 2 tablespoons of coulis over the tops of each. Store in the refrigerator until ready to serve.

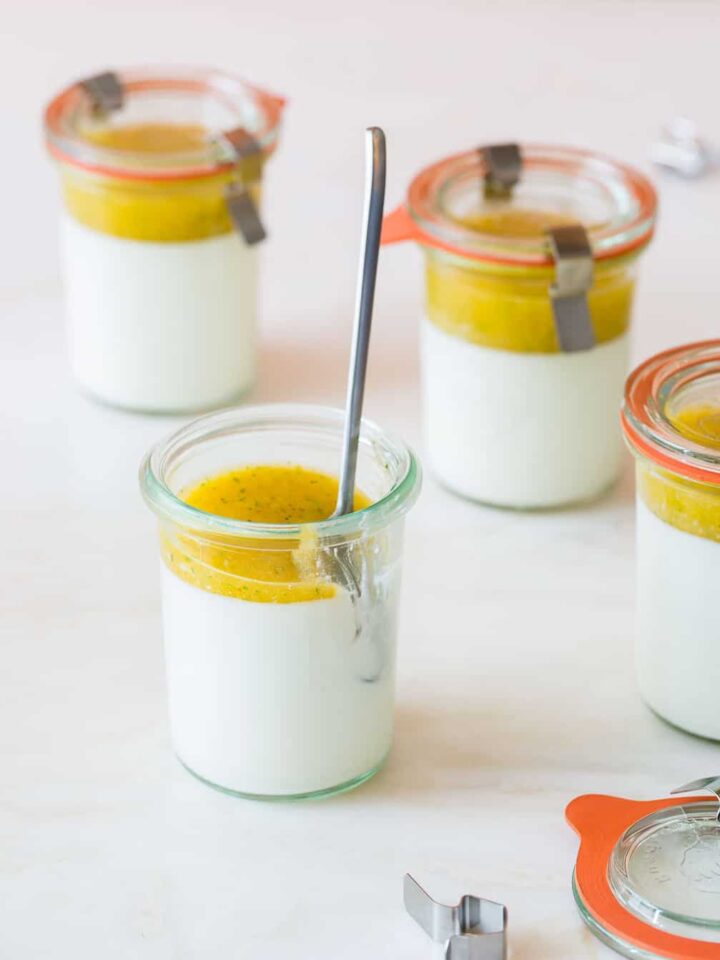
Simple Vanilla Bean Panna Cotta

February 11, 2013 · Uncategorized · 19 comments · PRINT

stumble
Share

There are two kinds of people, people who turn red when they are embarrassed, and people that do not. I can feel the blood travel from torso into my face when I am embarrassed enough to turn red, and I know it is happening. There is nothing I can do about it, and it sucks. The thing about turning red is you can’t just act cool and that what just happened wasn’t embarrassing because everyone knows you are embarrassed. Your face is red. Yesterday at the gym I had a face turning red incident. Like a lot of people, I have an iPhone Velcro sleeve thing that makes me look like a power ranger and a playlist aptly titled “work out” that contains a bunch of songs that help try and get into doing cardio.  While in the locker room sliding my iPhone into my armband thing, the music started playing really loud, and it was a monstrously inappropriate rap song. So so so inappropriate. I tried to swiftly make the music stop but of course my iPhone chose that moment to have a meltdown and so it took an extra couple of seconds to get it to stop. I could feel the heat of the all the naked women in the locker room staring at me questioning my offensive taste in music. Horrible. My face was so red, there was just no way I could play it cool. I ended up just staring at the floor, mumbling sorry, and getting out of there. Ugh. Anyway…

So we all know it’s flu season and people are getting sick left and right. We wanted to share a new sick soup with you. This egg drop soup is for people who are getting sick of chicken noodle, it could also be for people who just want a really cozy soup to eat while they watch this crazy storm brewing outside their windows. I hope everyone stays safe, and uses this as an excuse to make lots of yummy food.
♥ Teri

Egg Drop Soup with Rice Cakes
Serves 4

Ingredients:
5 1/4 cups low sodium chicken stock
2 garlic clove, thinly sliced
1 teaspoon salt
1/2 teaspoon white pepper
12 rice cake ovalettes (can find in freezer section of Korean/Asian grocery stores)
3 eggs, beaten
2 green onions, thinly sliced
garnish:
green onions, thinly sliced
cracked black pepper

1. Pour broth into a pot, add garlic, salt and pepper and bring to a simmer. Allow mixture to simmer for about 10 minutes.
2. Turn heat up to medium, bringing mixture to a soft boil. Add rice cake ovalettes and continue to boil for 3 to 4 minutes, stirring occasionally.
3. Slowly drizzle eggs into the broth, in a very thin stream.
4. Once all of the beaten eggs have been incorporated, very gently stir in green onions.
5. Ladle into bowls and garnish with more green onions if desired and cracked black pepper.

Egg Drop Soup

February 8, 2013 · Everyday Recipes · 19 comments · PRINT

stumble
Share

All content including images © 2013 Teri Lyn Fisher & Jenny Park. Stealing is bad karma.